Category Archives: tutorials

Join a shared Outlook Calendar

The procedure to join a shared Outlook Calendar takes only a couple steps, but it can look slightly different depending on if you use Outlook’s desktop client or the browser web app:

On desktop clients

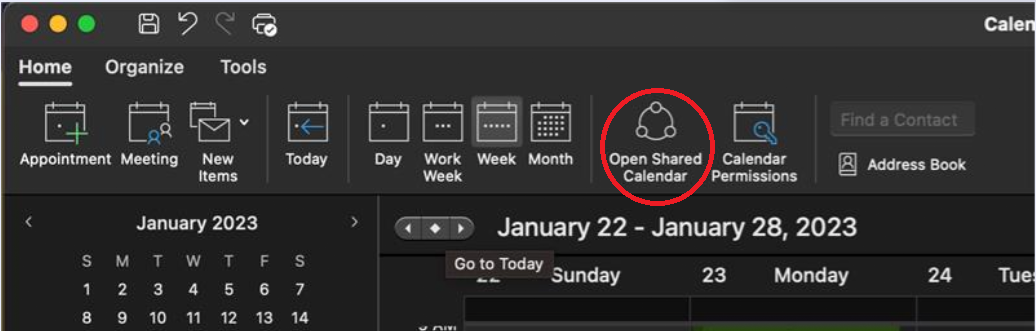
Click on “Open Shared Calendar” on the top menu bar when you have Outlook open and are at the calendar screen.

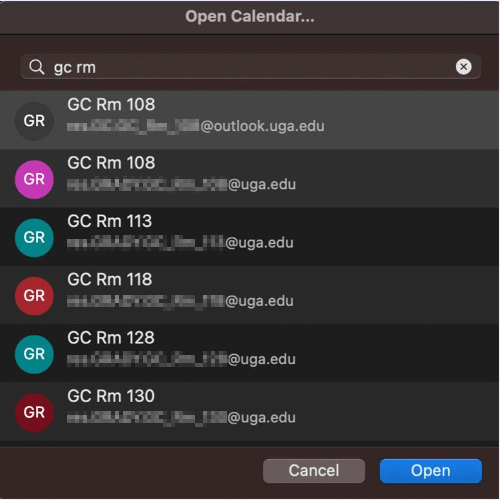
Then type “gc rm” to see a list of Grady College rooms that we have as resource records. From there you can add them to your calendars!

On the web browser app

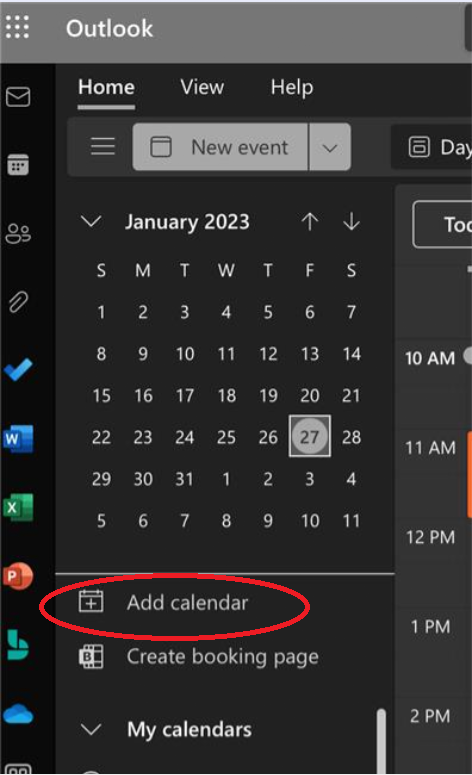
Click the “Add calendar” link under the monthly calendar view.

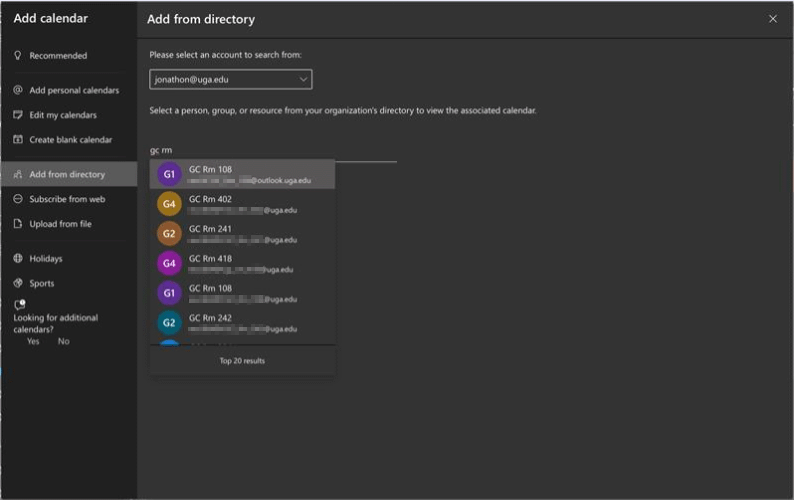
Find your email address in the drop-down menu, then click “Add from directory” in the left menu bar.

Finally, type “gc rm” to see a list of Grady College rooms that we have as resource records. From there you can add them to your calendars!

For more information, check out the Outlook Calendar training and help tutorial.

Poll Configuration Tutorial for Zoom

To enable polling for Zoom you must first schedule a Zoom meeting.

To schedule a meeting, visit uga.Zoom.us and choose the third option, Sign In (Configure your account).

After you are signed in you will be greeted with your Profile page. Within your profile page you can control advanced features for Zoom such as enabling polls, allowing co-hosts, and other options.

Zoom Profile Settings

Click on Settings to enable polls.

Polling within Settings

Scroll down until you locate polling.

Zoom Profile Page

Return to your Account Profile Page or Click on Meetings.

Click on Schedule A New Meeting.

Configure your meeting and click Save.

Scroll to the bottom of the next page and then click Add to configure your poll.

From that point on you should be able to successfully create a poll to be used in your Zoom meeting. If you have any issues please reach out to gradyhlp@listserv.uga.edu with questions.

Thank you,

-Jonathon

Zoom Features for Teachers

uga.Zoom.us

Learning and training for UGA students, faculty and staff

Official Zoom support knowledge base

A one-page reference explaining popular Zoom features such as Speaker and gallery view, Avoid background noise, Raise hand, Remove a learner, Disallow learners from changing their name, Annotation and Whiteboard

Here’s another single page reference with similar info but different author

Enable Polling: Step-by-step guide to changing your settings, by Jonathon

How to Prevent Zoom-Bombing: PCmag.com details a number of simple tips and settings

Cloud recording is automatically enabled for all UGA Zoom users. When you record a meeting and choose Record to the Cloud, the video, audio, and chat text are recorded in the Zoom cloud. The recording files can be downloaded to a computer or streamed from a browser.

Use the Audio transcript option (under Cloud Recording) to automatically transcribe the audio of a meeting or webinar that you record to the cloud.

General AV quality:

https://www.daily.co/blog/how-to-improve-the-quality-of-your-video-calls

https://itstillworks.com/improve-skype-video-quality-22271.html

Zoom specific AV quality:

https://support.revolverobotics.com/portal/kb/articles/zoom-i-am-experiencing-poor-video-audio-quality-why

https://blog.zoom.us/wordpress/2013/08/29/how-to-get-the-most-out-of-your-zoom-experience/

Continuity at Grady roundup

Starting Monday (March 16th) Charter Spectrum will offer free broadband/Wi-Fi access for 60 days to homes with K-12 and/or college students that don’t already have it. To enroll call (844) 488-8395.


from Sarah Freeman, Director of Communications, Grady College (03/17/2020) :

Good afternoon, Faculty and Staff — the campus communicators (StratComm) had a conference call this morning where several online campus resources were shared. While I am sure most of you have heard about some of these, there may be others you have not heard about so I thought I would share the list:

  • Main UGA Coronavirus Website (UGA’s most authoritative website; updated regularly and includes links to other resources, FAQ, directory of all Arch New announcements, etc.)
  • UGA Libraries (includes place where faculty can request articles to be scanned or streamed, as well as place they can request e-books)

Critical UGA IT Services for Business Continuity

Normal University business and classes can be disrupted by events and unforeseen circumstances such as weather, natural disasters, or health concerns. In many cases, faculty and staff may continue to teach and conduct business remotely using technology resources available to everyone at UGA.

Here are some of the tools EITS offers to assist students, faculty and staff in teaching, learning, collaborating and communicating remotely when meeting on campus is not an option: BlackBoard Collaborate Kaltura Zoom vLab Microsoft Office 365 Athena and DegreeWorks Remote Access VPN ArchPass OneSource Systems

Tips for uga.Zoom.us

Here a few recommended links that may help with AV quality.

General AV quality:

https://www.daily.co/blog/how-to-improve-the-quality-of-your-video-calls

https://itstillworks.com/improve-skype-video-quality-22271.html

Zoom specific AV quality:

https://support.revolverobotics.com/portal/kb/articles/zoom-i-am-experiencing-poor-video-audio-quality-why

https://blog.zoom.us/wordpress/2013/08/29/how-to-get-the-most-out-of-your-zoom-experience/

-Travion


Click the Start Menu in the bottom left corner and begin typing “Control Panel” (1.). When the Control Panel icon appears click on it to open (2.).

When the Control Panel window appears, click on “Devices and Printers”.


When the Devices and Printers window appears you will click on “Add Printer” (1.). A new window will appear and scan network printers, scroll down the long list to the bottom and select “The Printer that I want isn’t listed” (2.)


In the newly opened Add Printer window you select “Select a shared printer by name” and type in “\\masscommprint\” and a list of shared network printers will appear. Select the printer you want to add to your computer. The printer will now install the drivers and be available for use, just click continue or okay on the prompts that follow.


The Sharp printer is 205supply.grady.uga.edu.


-Jonathon Streetman


Photo Gallery examples

Seven styles, including the sidebar widget.

Thumbnail gallery:

[Best_Wordpress_Gallery id=”2″ gal_title=”Movies”]

Masonry gallery:

[Best_Wordpress_Gallery id=”3″ gal_title=”Thumbnails gallery”]

Mosaic gallery:

[Best_Wordpress_Gallery id=”4″ gal_title=”Thumbnails gallery”]

Slideshow gallery:

[Best_Wordpress_Gallery id=”6″ gal_title=”Thumbnails gallery”]


Image browser:

[Best_Wordpress_Gallery id=”7″ gal_title=”Thumbnails gallery”]


Blog style:

[Best_Wordpress_Gallery id=”8″ gal_title=”Thumbnails gallery”]

‘User Profile Cannot Be Loaded’ Fix

To fix the user account profile, follow these steps:

Important This section, method, or task contains steps that tell you how to modify the registry. However, serious problems might occur if you modify the registry incorrectly. Therefore, make sure that you follow these steps carefully. For added protection, back up the registry before you modify it. Then, you can restore the registry if a problem occurs. For more information about how to back up and restore the registry, click the following article number to view the article in the Microsoft Knowledge Base:

322756 How to back up and restore the registry in Windows How to back up and restore the registry in Windows
  1. Click Start, type regedit in the Search box, and then press ENTER.
  2. In Registry Editor, locate and then click the following registry subkey:
    HKEY_LOCAL_MACHINE\SOFTWARE\Microsoft\Windows NT\CurrentVersion\ProfileList
  3. In the navigation pane, locate the folder that begins with S-1-5 (SID key) followed by a long number.
  4. Click each S-1-5 folder, locate the ProfileImagePath entry in the details pane, and then double-click to make sure that this is the user account profile that has the error.

    • If you have two folders starting with S-1-5 followed by some long numbers and one of them ended with .bak, you have to rename the .bak folder. To do this, follow these steps:
      1. Right-click the folder without .bak, and then click Rename. Type .ba, and then press ENTER.
      2. Right-click the folder that is named .bak, and then click Rename. Remove .bak at the end of the folder name, and then press ENTER.
      3. Right-click the folder that is named .ba, and then click Rename. Change the .ba to .bak at the end of the folder name, and then press ENTER.
    • If you have only one folder starting with S-1-5 that is followed by long numbers and ends with .bak. Right-click the folder, and then click Rename. Remove .bak at the end of the folder name, and then press ENTER.
  5. Click the folder without .bak in the details pane, double-click RefCount, type 0, and then click OK.
  6. Click the folder without .bak, in the details pane, double-click State, type 0, and then click OK.
  7. Close Registry Editor.
  8. Restart the computer.
  9. Log on again with your account.

Tutorial on Adding a Networked Printer

Click Start -> Devices and Printers

Click on Add Printer

Click on Add a network, wireless, or Bluetooth printer…

Click on The Printer that I want isn’t listed…

In the box seen above, type \\masscomm\ and you will see a list of the available printers populated.

Select the printer you would like to add and click Next.

Follow through the following steps of adding the printer driver and be sure to uncheck “Make this printer my default printer”. After doing this the printer will be added to your computer.


-=MacOS Instructions-=


Select the Apple Logo in the top left of your OS and click on System Preferences…

In the System Preferences window that opens, select Printers & Scanners.


In the Printers & Scanners window that opens, click on the “+” sign in the bottom left to add a new printer.

To add a local printer connected via USB (in your office) then you will need to scroll down until you see a printer with your model number listed with the kind of “USB Multifunction”.


To add a network printer you will need to click the “IP” tab and type in the DNS name of the printer you want to add. The image below has the address the the mail room color printer.


After the Use: are is populated you just need to click Add and you will then have a USB or network printer added to your Mac.


How to set up Remote Desktop access

You can access your work PC remotely. Just make sure that you leave your computer on and you have turned off any power saving features, as it will not wake up from sleep.

If you have a Mac at home you will need Microsoft Remote Desktop from the App Store. Remote Desktop is built into Windows. You will also need to know your computer name, which can be found by right clicking on Computer in the start menu and viewing the computer name there.

On your home computer:

  1. Connect to the Cisco VPN
  2. Open Remote Desktop and put in computer name/address –
    • GC-******.msmyid.uga.edu, where ****** is the 6 digit UGA Property Control number for your computer
  3. Username is MYID\*yourmyid* and password.

You should then connect fine.